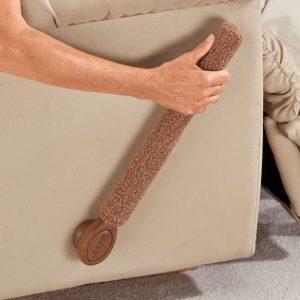
All furniture experiences wear and tear, but recliners are special because most furniture doesn’t have moving parts like a recliner. More than most seating types, recliners fairly often have moving parts wear out or break, necessitating repair or replacement.
The recliner handle or lever is a common point of failure. Once it breaks, you may not be able to engage the reclining mechanism anymore, leaving you with just a normal chair.

But recliners are surprisingly easy to fix. Damaged handles can usually be replaced with standard replacement parts available from a hardware store, big-box store, or the manufacturer.
Before You Get Started
If the chair is fairly new, check your files for a copy of the warranty. You may be able to get this resolved for free if the chair is still under warranty.
You do have files for all your warranties, don’t you? If not, start such files today. It can save you many headaches, not to mention time, money, and effort.
Obviously, you could also hire someone to fix it. But if you intended to do that, you probably wouldn’t be reading this. So, next up, how to repair or replace it yourself.
Repair Process
The problem may be as simple as tightening a loose screw. If you aren’t sure why it is not working, you should check for minor issues of that sort first.
It may help to have an assistant who can help you turn the chair over. You may also find a flashlight useful for getting a good, clear look at what’s going on with the mechanism.
However, in many cases, it will have simply snapped off. This will be very obvious and not anything you need to check. It is not wise to try to rig up some DIY home remedies. If the handle has broken, it is best to replace it with parts designed for that purpose. They should be readily available for purchase and not terribly expensive. It is not worth the risk of injury to mock up something and hope it works.
Get The Right Part
You should be able to find a model number on a tag on the underside of the recliner. Having this information can help you readily find the correct replacement part.
Keep this information handy when searching the internet, shopping in person, or talking to a salesperson or technician about your issue.
Getting the right replacement part is about half the battle. If you get this step right, the rest should fall into place pretty easily. If you get it wrong, you may be tearing your hair out trying to force-fit a part not designed for the chair in question.
So if you aren’t good at remembering long strings of numbers — and who is? — then make sure to write it down and take it with you when you go shopping. That way, you will know for certain which one it is if there happen to be two models with very similar model numbers.
In this day and age, the most convenient means to do that may be to email yourself the number or text it to yourself. If you have a smartphone, you can then look up the number with ease when shopping. You will probably have your phone with you any time you leave the house, thus making it less likely that you will forget to take the model number with you.
If the tag is missing or illegible, you may be able to ask at the store where you bought the piece in question. If that fails, you can check the manufacturer’s website. If all else fails, you can shop for a third-party handle. These are often available from online retailers and are sometimes designed to fit a variety of models.
DIY
If the footrest is currently elevated, manually push it down. You want the recliner in the upright chair position, not the reclined back position. You may then need to turn the chair upside down. If so, this is often a two-person job. Make sure you take precautions and don’t hurt yourself. A big hospital bill doesn’t help DIY efforts save you money.
Lever-Style Handles
For this type, the retaining screw is likely to be at the base of the handle on the recliner’s inside. You will need to remove the retaining screw so you can remove the handle.
You may need an Allen wrench, Phillips head screwdriver, or a Torx bit. Loosen the screw and remove it, then pull the damaged handle away from the recliner. You will also need to remove the escutcheon. This is a protective cover that conceals the mechanism.
Put the new, replacement escutcheon in place. Then put the new handle in place over it and screw it all together.
After checking to make sure the screws are tight and everything is solid, you will need to turn the chair upright again. Then test the mechanism to make sure it works and doesn’t need any further adjusting before you put away your tools.
Here is a video demonstration:
Black Oval Mechanisms
These are much smaller than the lever-style handles. They are also easier to replace.
You shouldn’t need to turn the chair over. It should be possible to do this in an upright position.
You need first to pull the mechanism to make sure it releases the cable. Then remove the two screws that hold it in place.
Pull the mechanism off the chair carefully, making sure not to damage the material in the process. Once it is off, remove the cable. Then attach the cable to the new mechanism, pop it into place and screw it back together.
Here is a video demonstration:
Conclusion
Whatever style of handle your recliner has, it’s not terribly hard to replace it. Just make sure you get the right parts and take reasonable precautions with the process.
